T-Bar Ceiling Installers in Vancouver: A Cost-Effective Elegance For Your Property
Vancouver Steel Stud Framing Ltd understands that T-bar ceilings offer overall aesthetics and functional advantages in commercial and residential settings. We're here to provide T-bar ceiling solutions to create the styles you envision while enhancing your property's appeal and increasing its market value.
We only use advanced methods for T-bar ceiling installation, and our skilled team of
T-bar ceiling installers ensures precise and efficient installation. Using our more than a decade of experience in the industry, expect your drop ceiling to be flawlessly beautiful and in line with your style.
What are T-bar Ceilings?
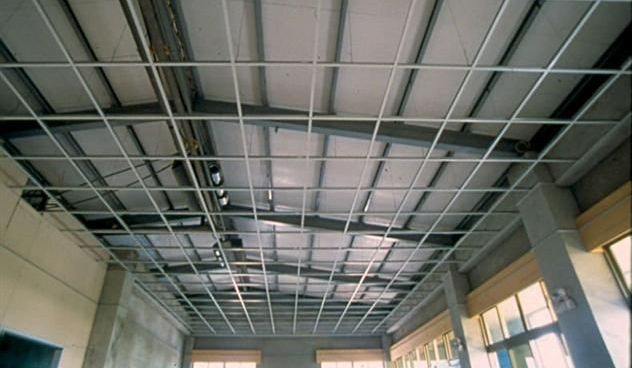
T-bar ceilings, also known as drop ceilings or suspended ceilings, can be made from wood or steel stud bars. They're traditionally arranged in geometric patterns to hide unfinished surfaces in a ceiling installation.
A T-bar ceiling system comprises a grid framework suspended from the structural ceiling. Ceiling tiles will then be fitted into the grid openings, which allows for easier access to the ceiling cavity while providing a polished appearance to an office room, bedroom, or part of the house.
T-bar Ceilings History
- The earliest record of T-bar ceilings was from 14th-century Japan.
- In the 1950s, Donald Brown, an American patent holder, popularized T-bar ceilings. He was largely credited as the inventor of the acoustic drop ceiling.
T-bar Ceiling Types and Advantages
-
Exposed Grid
A visible metal grid with ceiling tiles sitting within the grid openings.
- Cost-effective
- Easy to install
- Access to the ceiling cavity for maintenance and repairs
-
Concealed Grid
Concealed behind the ceiling tiles.
- More polished and seamless aesthetic
- Conceals the grid for a cleaner look
-
Lay-in Panels
Ceiling tiles sit directly on the grid without additional support.
- Quicker installation and replacement of tiles
- Easier access to the ceiling cavity
-
Glue-up Panels
Tiles are directly adhered to the existing ceiling with the use of adhesive.
- Smooth and uniform appearance
- Perfect for retrofitting or covering up ceiling flaws
-
Snap-in Panels
Tiles can be snapped into the grid without the need for additional hardware.
- Quick and hassle-free installation
- Easier removal and replacement of tiles
-
Acoustical Panels
Designed to absorb sound, suitable for spaces where noise control is important.
- Enhances acoustics by reducing noise levels
- Creates a more comfortable environment for occupants
-
Light Diffusing Panels
Reduce glare and improve lighting comfort. They are built from materials that scatter and distribute light evenly across the ceiling.
- Reduces glare and shadows for a more comfortable lighting environment
- Enhances overall illumination in your space
-
Fire-Rated Panels
Specifically designed for properties prone to fire. Built from fire-resistant materials to contain flames and prevent spread.
- Provides added safety and compliance with fire codes
- Helps prevent the spread of fire in case of emergencies
Our T-Bar Ceiling Installation Process
Common Tools for T-Bar Ceiling Installations
- Lag poles
- Lag screws and clips
- Chalk lines
- Pop rivets and pop rivet tools
- Tin, aviation, and compound snips
- Ceiling grid clamps
- Ceiling grid punch pliers
- Utility saws
How to Install T Bar Ceilings
-
Step 1: Preparation
Our installers carefully measure the space where the T-bar ceiling will be installed. We inspect your existing ceiling to determine potential issues that may arise, such as electrical wiring and structural integrity.
-
Step 2: Framework Installation
We attach metal tracks to the walls, creating a perimeter for the ceiling. These metal tracks are leveled and secured to support the T-bar grids.
-
Step 3: Grid Installation
This method involves the main and metal cross tees forming to form the grid pattern. We attach the cross tees to the main tees to create a network of intersecting lines.
-
Step 4: Drywall Installation
Our contractors will attach the drywall panels to the grids. We ensure the drywall panels are cut to the right size and fit snugly into the grid system.
Tips for Smooth Installation of T-Bar Ceilings
- Plan the layout - We take precise measurements and carefully plan the grid system layout to ensure proper alignment and spacing.
- Use only quality materials - We use durable materials, including T-bar ceiling tiles, grid components, and accessories, to guarantee the durability and longevity of the ceilings.
- Follow manufacturer guidelines - Follow the guidelines and recommendations from the manufacturer for optimal results.
- Check for levelness - Use a level to install the T-bar grid at the correct height, which prevents unevenness or gaps in the ceiling surface.
- Properly secure the grid - Secure the grid properly using the right fasteners.
- Work systematically—We install ceiling tiles and grid components methodically, starting from one end of the room to the other, to maintain consistency and efficiency.
- Ensure cleanliness - Keep the work area clean and debris-free during the entire ceiling installation to prevent contamination and achieve a flawless finish.
- Double-check measurements - Double-check measurements and alignments regularly throughout the installation to spot errors early on and avoid costly repairs
Costs of Installing T-Bar Ceilings
Drop ceiling installation may cost from $4 to $20 per square foot. Here's a breakdown of the average costs, depending on the work:
| Factors | Average Cost per Square Foor |
|---|---|
| Drop ceiling tiles | $1- $13 |
| Suspended ceiling grid | $1.50-$2 |
| Installation labour | $1.50-$5 |
| Total Average Cost | $4-$20 |
T-Bar Ceiling Design Options
Patterns of T-Bar Ceilings
Here are the various styles you may consider:
| Square grid | A grid framework with square-shaped openings where ceiling tiles fit. |
| Tegular grid | Tiles are slightly recessed below the grid, creating a subtle step-down effect. |
| Basketweave | Alternating rows of square and rectangular tiles add texture and dimension. |
| Geometric patterns | Could be various patterns, such as diamonds, triangles, or hexagons, created by arranging tiles in non-traditional configurations |
| Linear grid | Long, narrow tiles arranged parallel to each other within the grid, ideal in a modern office space. |
| Checkerboard | Alternates between two colours or types of tiles, like a checkerboard. |
| Diagonal grid | Tiles are laid out diagonally within the T-bar grid instead of the traditional horizontal or vertical orientation. |
| Custom designs | You can combine various tile shapes, sizes, and orientations within the grid according to your preference. |
Acoustic Considerations When Installing T Bar Ceilings
- Noise Reduction Coefficient (NRC) - The NRC indicates a material's capability to absorb sound. Opt for ceiling tiles with a high NRC to reduce echo and reverberation.
- Sound Transmission Class (STC) - It measures a ceiling assembly's capability to block airborne sounds.
- Ceiling Height and Volume - Taller ceilings with larger volumes result in longer reverberation times.
- Absorption vs. Reflection - There should be a balance between sound absorption and reflection. Incorporate acoustic ceiling tiles with various absorption levels to control reverberation.
- Ceiling Structure and Coverage - Ensure consistent and uniform coverage of acoustic tiles across the space to attain consistent sound absorption.
- HVAC and Lighting - The T-bar ceiling layout must coordinate with the placement of HVAC vents, lighting fixtures, and other components mounted on the ceiling.
- Additional Acoustic Treatments - These include baffles, clouds, or wall-mounted panels that can supplement the T-bar ceiling system.
- Compliance with Building Codes - Comply with building codes Vancouver to ensure quality acoustics throughout.
Maintenance Tips for T-Bar Ceilings
- Inspect Regularly: Check the ceiling tiles and spot cracks or discoloration. If you see these, replace them to maintain uniformity.
- Clean Gently: Dust regularly using a soft brush or vacuum to prevent debris from building up. Avoid using harsh cleaning agents.
- Check the Grid System Regularly: Inspect the grid for rust, corrosion, or loose connections in moisture-prone areas.
- Address Issues Immediately: Repair any damage immediately to prevent further deterioration and safety hazards.
- Maintain Structural Integrity: Regular maintenance will preserve your T-bar ceilings' appearance and structural integrity.

Applications of T Bar Ceilings in Vancouver
Residential Applications
We install T-bar ceilings on residential properties for their rooms, kitchens, bathrooms, living rooms, bedrooms, or home offices.
Commercial Applications
We offer T-bar ceiling installation for efficient and cost-effective ceiling systems in commercial spaces like offices, retail stores, and healthcare facilities.
More Applications
We install T-bar ceilings for other spaces, such as theaters, churches, hospitals, and auditoriums.
Ready to Upgrade Your Ceiling Space?
For T-bar ceiling installations, trust Vancouver Steel Stud Framing Ltd. Our team of skilled and experienced ceiling installers can create and build beautiful Vancouver T-bar ceilings that will uplift the elegance of your living space. Say goodbye to your old ceilings and hello to fresh, modern ceiling designs with our superior craftsmanship.
Let us handle your T-bar ceiling project and provide professional guidance every step of the way. Experience quality service, unmatched customer service, and timely project completion—all within your budget!
Contact Us Today!
Frequently Asked Questions

Address
4214 Miller St. Vancouver, BC, V5N 3Z8 Canada
Phone
604-200-4708
vansteelstuds@gmail.com